
Ceiling Repairs Perth are essential to keep your property at its best. Whether it is patching, painting, popcorn ceiling removal or tile replacement, all contribute to a refreshed, captivating interior.
For small holes or cracks, repairing them with setting-type joint compound is a simple and cost-effective solution. For more significant damage, a new piece of drywall may be required.
Ceiling cracks are a common sign that it’s time to perform some repairs. The shape and size of the crack can provide clues to its cause. While one or two spiderweb-like cracks may be harmless and can sometimes be corrected with drywall repair techniques, any structural damage is serious and should be dealt with by professionals.
If the crack is accompanied by water stains, it could be due to a leaky roof, a burst pipe or other water-related issues. These issues must be addressed immediately to avoid further damage and potential mold growth, which also requires professional attention.
The crack may be the result of settling, which can cause the house to shift unevenly and lead to sagging and cracking. It’s possible to correct this issue by installing piers under the house, which can help shift the weight of the home and prevent future settling.
Another common cause of ceiling cracks is improper taping of drywall joints. This can cause the tape to loosen over time, leading to a straight crack. If the crack goes through a light fixture or vent, it will be more difficult to hide.
If you’re considering repairing a crack on your own, it’s best to get a few tools and a ladder from a local hardware store before starting. You’ll need to place a plastic sheet on the floor beneath the cracked area, as you’ll be loosening debris, applying mud and generally making a mess. It’s also a good idea to remove any furniture that’s in the way, as you’ll need plenty of room to maneuver and reach the ceiling.
After the crack is patched and sanded, you’ll need to paint it so that it matches the rest of your ceiling. Choosing a water-based primer that’s compatible with your ceiling paint will allow the new coat to adhere and blend seamlessly with the surrounding surface. Use a brush or roller to apply the paint, taking care to ensure even coverage. Be sure to choose a color that closely matches the rest of your ceiling for a professional-looking finish.
Water Stains
Water stains can leave behind unsightly brown spots that affect the overall appearance of your ceiling. They can also be a sign of an underlying issue that needs to be addressed, such as a leaky roof or plumbing problem. When the source of the stain is identified and fixed, it can prevent further damage and recurrence of the stain.
To clean a water stain on your ceiling, begin by protecting nearby surfaces with drop cloths. Then, using a sponge or cloth dampened with clean water, gently scrub the stain to remove it without damaging the surface. Rinse the area with clean water and allow it to dry completely before painting. Choose a paint that is designed to be used with water stains, such as a stain-blocking primer. Apply multiple coats as needed to achieve an even coverage, and let the paint dry between each coat.
Inspect the affected area of your ceiling visually to determine the extent of the damage. Look for areas with discolored or peeling paint and check to see if there is a soft, spongy texture. Water damage that is allowed to go unchecked can result in mold growth and structural issues, which are more serious and costly to repair.
If you find any signs of water damage to your ceiling, such as a hole or crack, patch it with a spackle or drywall compound. Once the affected area is dry, apply a stain-blocking primer and then ceiling paint to restore its appearance. Be sure to choose a paint that matches the existing color of the ceiling. Regularly inspect your ceilings and any other affected areas of your home to prevent water stains and ensure proper repairs. Contact a professional for more extensive problems such as a faulty roof or a major plumbing overhaul. A licensed plumber, contractor or mold remediation specialist can provide expert assessment and repairs to help prevent water stains in your home. They can also provide tips on how to avoid them in the future, such as regularly cleaning gutters and ensuring proper ventilation. By taking these steps, you can keep your home safe and beautiful for years to come.
Drywall Repair
Drywall repair in ceilings can be challenging for homeowners without the proper skills and tools. While DIY drywall projects can seem cost-efficient, improper repairs can lead to more damage or costly replacements down the road. A professional drywall contractor can save you time and money by doing the job right the first time.
If your drywall has visible cracks, water stains, or a sagging ceiling you will need a professional drywall repair company to fix the problem. A professional repair will not only restore the appearance of the ceiling but also protect it from further damage. Whether your drywall is damaged from a flood, water leak, or just due to age, a professional can repair the problems.
Small holes in drywall are often patched with a technique called “wall spackling.” A basic tool like a putty knife and joint compound can be used to apply a spackled coating. This technique is best for surface dings and small nicks, especially on the edges of rooms where wall-to-wall transitions occur. Larger nicks require more advanced techniques, such as mudding and taping to prevent future cracking. These larger holes are also called “tape patches” and require more finesse when applying the joint compound and sanding.
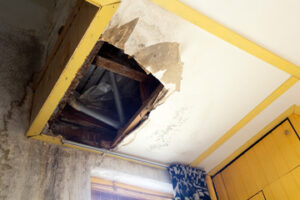
Large drywall cracks in ceilings are most commonly caused by thermal expansion and contraction of the structural framing and joists. Cracks may appear as a small hole or a sag in the ceiling. If left unchecked, cracks can cause serious problems such as rot and mold.
In some cases, a crack can be repaired by skim-coating the affected area. Painting contractor Noah Kanter describes the process:
The drywall must be sanded and reprimed before it can receive a skim coat. This process covers the blemishes, renews old drywall and plaster, and prepares it for paint. The result is a smooth surface that will not only look better but also reduce the cost of a full ceiling replacement.
Plaster Repair
It’s important to address water damage to ceiling plaster as soon as possible. To help prevent further damage to your home, turn off the water supply to the affected area, remove any excess moisture with a wet-dry vacuum or a towel, and open windows and set up fans to speed up the drying process. Once the area is dry, you can begin repairs.
When repairing plaster in a ceiling, it’s important to prepare the surface and apply a finish coat that will blend the repaired area with the existing ceiling. Start by removing any loose or crumbling plaster and filling in any cracks or holes. Next, apply a plaster compound using a putty knife. Aim for a smooth surface and apply additional layers of the compound as needed. After the surface is smooth, let it dry thoroughly according to product instructions.
Once the plaster is dried, it’s important to sand down the repair areas. This step is not only essential for a visually appealing restoration, but it’s also vital to ensure that the restoration can withstand future wear and tear. Silva recommends using a kitchen sponge to sand the compound, as it will reduce dust and mess compared to traditional sandpaper.
Depending on the extent of your damage, you may need to reattach loose plaster or replace damaged sections with drywall. For areas where the plaster is simply missing from the lath, reattachment is usually preferred. This approach will allow you to save a portion of your historic ceiling, and will be less expensive than replacing the entire area with drywall.
When reattaching loose plaster, make sure to protect the floors and furniture in your work area with drop cloths, and use a ladder or rolling scaffolding platform to safely access the ceiling. Be sure to wear a dust mask and safety goggles for protection. Once the area is clear of any debris, apply fiberglass mesh tape to the damaged section of the ceiling. Cover with a thin layer of setting-type joint compound, using the tape to avoid cracking and splitting. Smooth the compound and feather the edges to create a seamless surface.